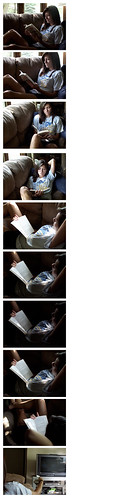
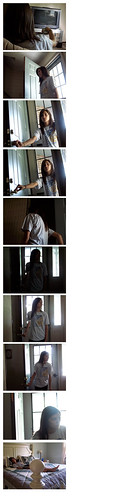
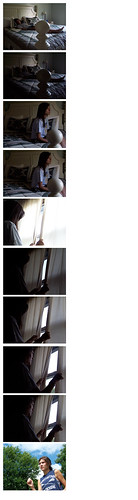
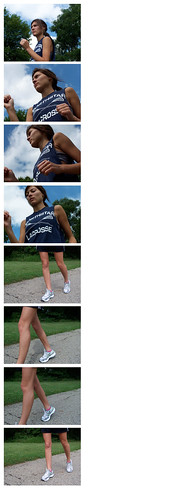
In the girl Scenes I wanted a more natural lighting to try and show that type of mood with the Character. I wanted to impose she was at peace and zen with her actions and surroundings.
I didn't use much artificial lighting but still tried to use the direction of light to show form and to tell a story in the photos, I believe I accomplished what I intended to do to differentiate these series of photos from the male series.
There will be more posts later today in which the photos will be edited to push the ideas further in both the male and female photo series'
Thursday, July 23, 2009
Girl1
Saturday, July 18, 2009
MalePicsPg3
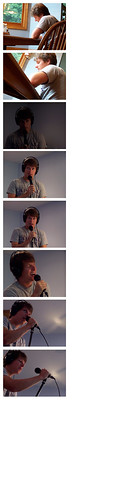
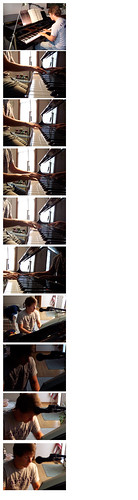
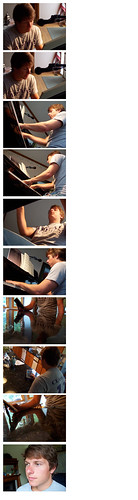
On the links Below are the original Photo-shoot photos of the male parts of my music video for Jack's Mannequin "The Mixed Tape". There is only one column up because the right column will have the finished edited versions of the pictures I choose to proceed with.
In these photos I wanted to make them very contrasty with light lights and dark darks. I used some natural light from outside but set up lamps and other light sources for good artificial light quality in order to get good directional light. I did this type of lighting in order to show more movement in the faces and objects because I feel that it would get more attention by the viewer, it would be more aesthetically pleasing.
Thursday, May 28, 2009
Okay,
so here are the new links since the other ones weren't in RGB. The clarity in them aren't too great because I just took a screenshot, but the color adjustments can be seen fairly well.
Wednesday, May 27, 2009
Video Layer Adjustments_Post 1
Okay,
So I took two still images from the video and brought them into Photoshop and adjusted them to create a better video feel and to get the viewers eyes to follow better and recognize the contrasting of the two people. for some reason the JPG images are fine on my files but look really funky on here. I'll give a link to Photobucket Here and Here so you can see them better.
The first image is the man at the piano. I put 3 adjustment layers on it. An Exposure layer, Hue/Saturation layer, and a Brightness/Contrast layer. On the Exposure layer, the exposure level is at +.51, offset level at -.0439, and gamma level at .93....this creates a more unnaturalistic feel. On the H/S layer the hue level is at -16, creating a warmer feel, the saturation level is at +5, and the lightness doesn't change. The B/C layer is the layer that creates the darkness of the scene, I am trying to focus the shot strictly on the man's hands playing the keys and not any of the background areas. The brightness level is at -103 and the contrast is at 100.
The second image is of the woman running in the park. I plan on reshooting this whole scene at a different park though, but for now this is around the color choices and adjustments that I would like for it though. I used 3 adjustment layers for this scene as well. Exposure, Hue/Saturation, and Color Balance. The Exposure and H/S levels are fairly similar except for the hue level is opposite in order to reveal the opposing positions of the two characters. the Color Balance adjustment is there to further enhance the coolness of the scene.
Wednesday, May 6, 2009
designer Stage-video, rough edit2
I have edited a little more, not anything with color correction though. but have tried to smooth some transitions out from last video and created a 16:9 ratio for the whole video.
I have compressed the video from an HD 1080 x 720 (600 MB) to an 8.1 MB film to be able to post on blogger.
Once I get credits at the end I'll be able to post it on VIMEO.com and it will be better video quality. But for now this is what I have.
designer Stage-video, rough edit
Hey all, my video is all shot, edited and transitioned roughly. I used YouTube for my video upload so there is no sound because they took it out because of copyright infringement. So just follow along with the video and comments would be greatly appreciated, thanks!
Wednesday, April 29, 2009
Designer Stage-updates
Hello everyone, much needed post update coming up.
I have been working on my video shoot now for a few weeks and suffered some rough patches. But nothing too serious. I have my girl scenes all shot and into my video editing program, although it took another computer to be able to capture the film because the schools final cut wouldn't work right and my computer doesn't have a firewire outlet, and I don't have an adapter. but like I said, they are all in there.
Also, I wasn't really too sure how to publish partial clips until I talked to Charlotte about it. Thats the reason why I haven't posted anything in awhile, but I still am getting lost on how to do it. So I will problem shoot more and finally get some video posts up for comments.
I apologize for the intermission between posts, but expect a video post within a day or two.
Tuesday, March 3, 2009
Designer Stage-Picture stills


I am doing my film as a Cross-Cut meaning I will have the Man and the Woman doing certain things at the same time in different scenes while the perspective is cutting back and forth. I am making the scenes with the Man in them more warm feeling with a reddish tint/filter and the scenes with the Woman in them cooler with a blueish tint/filter.
Designer Stage-StoryBoard
Here is my Animatic Storyboard from which I will be using in guiding me for my video.
The transitions are kind of hard to follow so I will describe them.
1. Man at desk scribbling thoughts and lyrics on paper. camera pulls out through the radio speaker...
2. Woman waking up and walking to the window. camera follows her action and gets to eye level. camera then pulls in through the window...
3. Neighborhood shot. camera tracks though the neighborhood back to the Man's house.
4. Man's living room. camera pulls in back through his window and pans on his face as he turns. the camera then cuts to a spot in front of the Man as he walks to a counter with a picture of the Woman and a letter from her. the camera pan's around so that we are back at Man's eye view.
5. Letter view. On the letter are the scenes of the Woman acting out the lyrics of the song. camera then pulls out and gives a back view of the Man reading the latter on a chair.
6. Puzzle scene. The back view then turns into an unfinished puzzle with the man holding a piece with him in it. the camera follows the close up view of the piece as it is flung across the room fitting onto another puzzle where the man is singing with a mic stand.
7. Studio area. The puzzle fades out into the real scene and the camera pulls and tracks around the Man singing into a back, slightly overhead view. camera the pulls into the mic holes and goes through into the next scene.
8. Woman running in the park. camera tracks from back view to side view to front view then to her other side view where she has an ipod strap on her arm. camera then pulls into the image on the ipod (which is the Man playing a piano to the song)
9. Piano playing. camera tracks around character reaching front view. the camera then follows the mans hands as he plays the piano to the song. the camera then pulls out through the TV into the Woman's living room.
10.Woman's living room. back view of woman lying on couch holding remote watching the Man playing piano on the TV. She then turns off the tv and walks through the kitchen into the dining room. camera tracks with her and stop in the kitchen focused on a radio there. In the radio is a tape labeled "The Mixed Tape".
11. Radio. The camera pulls to a close up view of the label on the tape. the scene then fades into another scene where the letters stay the same but are on a piece of paper on a desk with the song lyrics and the Man sitting in front of them. There is an overhead view as the man shuffles around the papers tryng to locate his tape.
12. Man's room. camera pulls out and pans as Man walks to another desk in the room. camera then pulls into a close up of his eye.
13. Man's Eye. camera is stuck on his eye as two scenes play out in it between his blinks. one scene is the woman reclining in a chair reading and the other is her brushing her teeth getting ready for bed. camera then pulls out and continues to pan with the Man.
14. Man. camera follows the mans hand and pulls in to a close up view of him placing the tape onto another surface. his hand then is taken off.
15. Tape. camera slowly pulls in to an extreme close up of the tape as the song ends and fades to black.
Designer Stage-changes
I have not posted any results up for my previous stages because of two factors. One, my experience in Maya is not what I wanted and I think I am getting too ambitious and I need much more practice before starting to do a full project with it. And two, I lost my paper with all of the dates and still haven't got another one. No fault but my own on that.
But I have decided to not use Maya except for maybe some minor special effects that regular video might not be able to accomplish. So I am going to do the same project but in strictly video. I will edit the video in Final Cut, and possibly in After Effects. I have not been able to check out one of the schools video camera's because I wasn't aware of the time for checking them out and I have also waited until the last minute to check it out. So in my next post I will have photo stills on site of where I want to shoot my video. I will also describe what color choices will be chosen and why.
But I have decided to not use Maya except for maybe some minor special effects that regular video might not be able to accomplish. So I am going to do the same project but in strictly video. I will edit the video in Final Cut, and possibly in After Effects. I have not been able to check out one of the schools video camera's because I wasn't aware of the time for checking them out and I have also waited until the last minute to check it out. So in my next post I will have photo stills on site of where I want to shoot my video. I will also describe what color choices will be chosen and why.
Tuesday, February 3, 2009
Studio Project_Explorer: Second Post
I liked Jennifer's comment on maybe mixing video with some 3D animation. I think I'm gonna try and use some of that idea and film my scenes and locations with one of the school's HD camera's and then use Maya for the effects and the 2 characters in my project. I'm not sure my style yet I looked at a lot of tutorials and continue to do so. I'll post a few of them regarding some face designing and stuff regarding that. But unfortunately I haven't played around to figure out my style but I will when I come in tomorrow morning. So here are some posts of a few tutorials I've watched.
Tuesday, January 27, 2009
Studio Project_Explorer: First Post
This is the first step of our semester long Studio Project for my Design for Media class. The idea behind this project is to get our mind set on what the future will have in store for us in life after these set classes and projects given to us. We as the student will get to choose what ever it is we want to work on to further our knowledge or certain desired discipline. there will be progress checks along the way and that is where some or probably most of our grade will be drawn from (as well as some participation points here and there). There will be four Benchmarks in this process that directly relate to "real world" work. The Explorer, Designer, Judge, and Producer stages; each with its own unique distinction and importance in the completion of this project
I have chosen to use one of my previous story-boarded ideas from my TB Media Design class and take it to the next step by implementing it into an actual 3D animated video to music. The song is "The Mixed Tape" and the artist is the band Jack's Mannequin. My chosen style is not yet determined yet so that is what this stage is for; to search the vastness of the world wide web to see how I would like to compose my idea in a new original way. So with that being said I will show some various YouTube animations I find interesting to me along with the Jack's Mannequin "The Mixed Tape" video's out there. enjoy
Watch more cool animation and creative cartoons at aniBoom
Subscribe to:
Posts (Atom)
